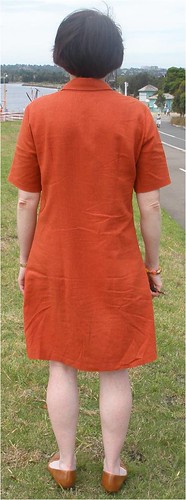
The Rust Shirtmaker Dress is completed.
 At the Armoury Cafe at Newington after our ASG Christmas Lunch
As promised in my earlier post here are the details:
Back Adjustments
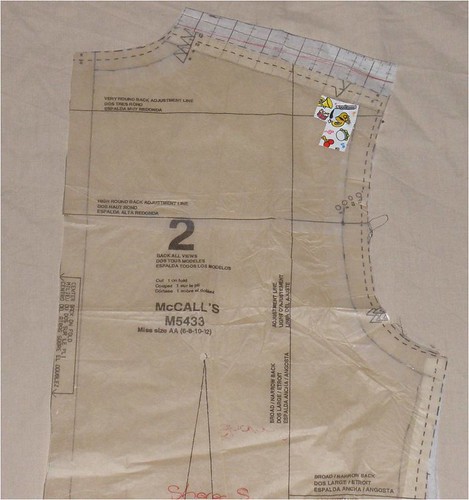
- Added 1.5cm at the neck edge of the shoulder and increased this to 2.6cm at the shoulder edge
- Added extra to the side seams starting 5cm down from the armhole to end up with 2cm extra width at the hem line (you can see this on the front pattern piece below).
- Added 3cm to the length (you can see this on the front pattern piece below).
Front Adjustments

- Added extra to the side seams starting 5cm down from the armhole to end up with 2cm extra width at the hem line.
- Added 3cm to the length.
Collar and Collar Stand Adjustments

- Added 1.5cm into the collar and collar stand.
Note: The patterned sticky tape on my patterns is to remind me to turn my pattern over when I go to iron the pattern after it has been folded, so I keep the iron off the sticky tape, a tip from Pam.
Construction
During construction, Pam decided to reduce the collar length by 1.5cm as the collar was a bit large for me.
I also decided to use the shorter sleeve and found that the shoulder width needed to be reduced by 1.5cm at the shoulder edge reducing back to zero by the time I got to the notches.
Embellishment
Rhona Feeney, who I sew with at the Alexandria Achievers, suggested that I put half circles on the back of my Shirtmaker dress to cover the side ventilation.
- I traced off a circle using my bobbin keeper and then folded it half and cut out two in the rust linen.
- Sewed a line of stitching the width of the machine foot from the edge around the half circle and then a gathering stitch between this stitch and the edge.
- Drew up the gathering stitch and then pressed the seam allowance down along the line of the first row of stitching.
- Unpicked the side seams of the Shirtmaker dress and put the long edge of the half circle into the seam and then I pinned and basted the half circle in place.
- Very slowly topstitched the half circle in place.

Also at this time Rhona took out a 1.5cm fold from the middle of the back darts to the hem, effectively taking out 6cm of fabric out of the back of the Shirtmaker.
I tried to do the buttonholes myself, but wasn’t feeling too confident with 9 of them, so on my way to work the other morning, I dropped this into Mick of Quick Buttonholes at Alexandria for him to do my buttonholes. I had pinned the button placement on the button band, and left him a reel of my cotton and a button attached in a small zip lock bag to the Shirtmaker. The next day, again on my way to work, I collected this from Mick who charged me $25 for the 9 buttonholes on the Shirtmaker dress and the 1 he did for me on my Jeans. Money very well spent.
This is a very comfortable dress to wear and I can see a few more versions in my wardrobe over the various seasons.

Fantastic dress Sharon, it looks so comfortable (& stylish of course), I especially love the colour :-)xxh
LikeLike
Your topstitched half-circle looks especially nice. Very professionally done.
LikeLike
Hi SharonYour dress looks great. I really like the half circles, well sewn and they give the dress an edgy look, great suggestion by Rhona. I love the colour and your shoes and braclet bring it all together. Well done.Lee-Anne
LikeLike
Glad you finished on tome for the Christmas lunch. The half circles were a good idea, although I liked your original idea too.
LikeLike
Terrific dress! You are fortunate to have somewhere to go get professional butonholes done. Enjoy wearing it.
LikeLike
I'm new to your blog … what cute things you've made!!! This dress is lovely, very flattering on you.
LikeLike
It is a lovely dress, wonderful fit and color. What a great idea for dealing with the ventilation hole. The circular pieces look like a unique style detail.
LikeLike
This comment has been removed by the author.
LikeLike
Great dress – very comfortable yet stylish – the colour suits you – it took me a while to \”get\” the whole ventilation thing – WOW – a clever solution that looks like a designer touch of genius! Welcome back!
LikeLike
Very nice dress. Great colour, especially for you. The half circles are inspired and a great detail. And it was a smart move getting to buttonholes made for you.
LikeLike
What a great dress – I love the colour!
LikeLike
Love this dress Sharon. It's turned out really well and additional features make it more special. Love it.
LikeLike