2016 in Review

I am definitely late to the party this year,  but I do like to look at what I managed to achieve each year.

Gillian has again encouraged us to look at our Top 5 Hits, Misses, Highlights, Reflections and Goals for 2016.

Hits

Reptilian jeans, I love them.

Pleather top, I am so pleased how this worked out.

My BIL’s Ducati Henley, I thoroughly enjoyed the process and how well it turned out in the end.

Misses

The rayon shell top is a fail, I do not like how it works with the top I made, probably wrong fabric choice.

The biggest fail and the one that completely took away my sewing mojo for quite a bit of the year was Burda 7286 Jacket, wrong fabric, gaberdine weave doesn’t work with tailoring!!

Highlights

  • I’ve travelled a lot this year, Armidale, Brisbane as well as Puyallup where I met Carolyn and Patti.
  • Attended 2 sewing weekends with my sewing buddies.

Reflections

It was an interesting year last year, I seriously took up Continental knitting and am enjoying it immensely, there is a cardigan that just needs the buttons sewn on and it fits perfectly.

The bags I have made have filled a hole in my life both for travel and also at home.

My addiction to fabric has not been cured or curtailed, unfortunately more came in 42.95 than last year and less went out 20.1.  This does not include the bags.

Goals

I managed to complete 2 of my goals for 2016:

  1. Picking (Continental) knitting. 
  2. Entered the bag contest at Pattern Review.
I am carrying the other 2 across to 2017 as they are still projects that I want to complete e.g.
  • Pants
  • Lingerie
Finally, I would like to thank everyone who visits my blog, takes the time to comment and share my sewing, knitting and jewellery making journey with me.

Now for the collage of my makes for 2016.

Reptilian Jeans

When my sister saw these on me today she complimented the jeans and then said it wasn’t a garment she thought I would wear (patterned legs).

All photos taken by my Sister, thank you.

I had pinned this from Sportscraft as I had purchased a similar patterned Cotton Sateen from Spotlight back in 2013.

Cleo Twill Ankle Jeans

Why Reptilian jeans, well hubby thinks the fabrics looks like snake skin but as I am not fond of them at all, I have decided to call them my Reptilian Jeans!

These were cut out back in September and taken to a sewing day with some Sydney Spoolettes at their Sewing Social day at Bobbin and Ink.  I managed to get the front (except pockets) and the back with pockets sewn on the day.

Then they got put aside so I could make my bag.

Their next outing was at a Sewing Weekend with my sewing buddies at the Mercure Parramatta where the pockets were installed, the seams basted together for a fit to check if I needed the extra 2cm I had added to the seams as the Cotton Sateen didn’t have the same amount of stretch that my denim usually has.

It worked out that not all of the extra fabric was needed so I ended up using 1.5cm seam allowances.

The jeans then were stitched, overlocked and topstitched ready for the waistband but this time the sewing mojo had disappeared and they sat in my sewing room waiting.

The other weekend the waistband was added, button hole stitched, button sewn on and hems done and they are finally finished.

The top I am wearing was gifted to me by my very good friend Dilliander who was not comfortable wearing this orange linen version of V1247 which is perfect for me.  The length of this top is perfect to wear with jeans and the only change I have made is to take off about 1.5cm at the centre back hem as I was getting a “duck’s tail” after sitting, you can still see it still folds up a bit here.

I also used some quilting cotton for the front pockets.

Now I need to make some more plain tops so I can wear these jeans as they are the perfect weight for this time of year.

******************
2016 Stash Out: 15.1 m
2016 Stash In: 18 m

Pleather and knit top

We are going to have to do something about the lemon tree!

The inspiration for this top came from this top pinned that I pinned 2 years ago from Lafayette 148 New York and have been meaning to make it for ever.

Kerryn’s Fabric World sent me some swatches back in 2012 and they had this Polyester Spandex that has a leather look to it that just had to be added to my stash.

It has a knit backing but has no stretch to it at all.

Then when I made my Drapey cardigan back in January, I realised that the merino wool looked pretty good next to the Pleather.  So with some very careful cutting out I managed to get the cardigan as well as the back and sleeves for this top using KS 3740.

As the Pleather is essentially a woven fabric, I used Vogue 8572 my TNT woven blouse for the front, but wanted to add princess seams to it as well.

This was the 2nd item that I packed to work on during the Sewing Weekend in Brisbane and after I finished my cardigan I then started work on this top.

First up I traced off the front of V8572 and then proceeded to add armhole princes seams + 6mm seam allowance (so I wouldn’t get confused between the two patterns).

Original front pattern

Armhole Princess Seams added

I cut out the front and then basted the front and back together to check the fit.

There was quite a bit of excess fabric above the apex curve and as I could see this myself I didn’t take any measurements to put back on the pattern so I am not sure how much we ended taking out or how much we smoothed out the curve 😦

The back was a different matter,

So I took out a 1,5cm dart at the neckline down 8cm and then took a 2mm seam all the way down the centre back so from the right side it looks like I have a centre back seam

The rest of the top went together very well, I added a knit neckband to the neckline and then used my Coverstitch to finish of the neck edge.

As well as all the hems

Of course I have finished this right as the weather is starting to warm up but the top had its first outing to the ASG Industry Day at Simplicity Patterns yesterday which is in a big tin shed and this top kept me very comfortable.

******************
2016 Stash Out: 13.7 m
2016 Stash In: 18 m

#SewingDares – Cardigan

It must be the weather, but when I read Gillian’s post  on #SewingDares – Its’ back! I thought why not and it might just be what I need to get my sewing mojo back.

I did wonder what Gillian would come up with for me and I must say I was very happy with the dare that Gillian has given me:

You mentioned needing more layering pieces in your wardrobe, so I dare you to sew a drapey cardigan and/or long-sleeved tee!

The best part of the dare is that there is no time frame but I did want some winter layers/tops so that did make me focus on it a lot quicker.

I do have a drapey cardigan that I sewed back in January and at this stage I don’t need another one, but after seeing all the long cardigans about this year, I thought this would be an excellent alternative.
 
I purchased this fabric back in 2004 at Martin and Savage Textiles during an ASG Industry Day and it has been quietly maturing in my stash.

What I wanted was:

  • Cardigan to be open e.g. no closures
  • Length to fingertips

I then figured out that my TNT t-shirt pattern KS 3740 would be perfect with some length added.

Pattern changes:

  • added 18cm in length
  • full bicep adjustment on sleeves of 1.5cm (eventually)
The rib in this fabric is quite distinctive so I cut it in single layers to make sure they were straight.

I did wonder how I was going to finish the edges as I didn’t want a band as the fabric was too thick for that option.

This fabric looks brown, but when I auditioned various bias tapes, it looked a lot happier with olive.
Now this cardigan was started back in May and was up to the binding, but the sleeves were too tight, as I hadn’t done the Full Bicep Adjustment then 😦 and they were 4 thread overlocked in place, and it has been sitting in the too hard corner since then.
Thankfully I had enough fabric to re-cut the sleeves so that was a relief.
Then last weekend a group of us from Pattern Review got together in Brisbane for a weekend of sewing and this cardigan was one of the items I worked on.
Luckily for me, my sister has much better eyesight and very generously unpicked the 4 thread overlock so I could add my new sleeves.
Then I started to scratch my head about the bindings when Skye, who was sitting next to me, suggested I just turn the edges under and Coverstitch!  Why do I over think things!  
To finish the edges for the Coverstitch I added some interfacing:

  • Neck edge – Formband  colour charcoal
  • Front edges – Edge Tape colour charcoal which I cut into 1cm strips.

I am very happy with the result as this cardigan tends to float about as I walk and the bound edge would have been a lot more noticeable.

I did add some bias for the sleeve hems.

Here is how I wore it to work last Friday.

I think it will be a great layering piece until the weather warms up.

******************
2016 Stash Out: 10.2 m
2016 Stash In: 18 m

A Special Birthday present!

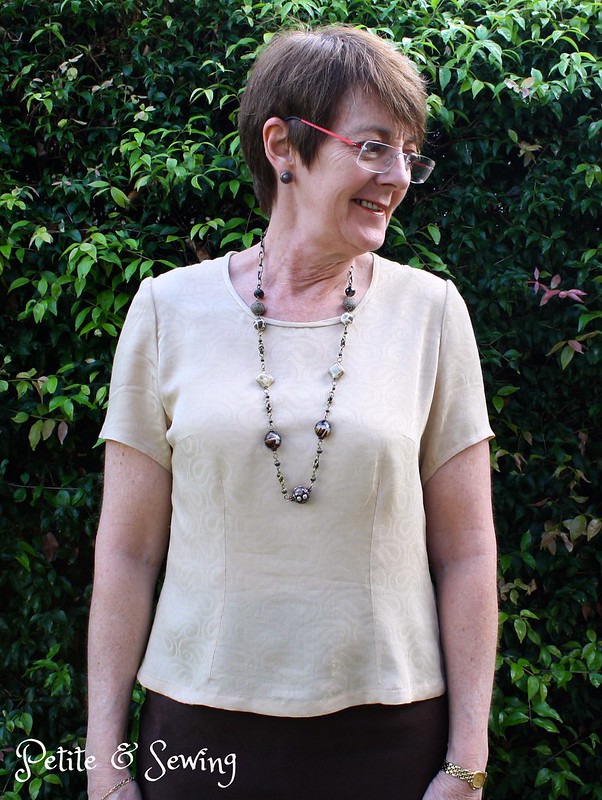
My DBIL is a keen Ducati lover and rider and he celebrated a big “0” birthday in April with friends and family.

I had been racking my brain what I could do for a present that was a bit different.

Then I started to see some patterned mens t-shirts about and was seeing a lot of fabric printed at Spoonflower and an idea started to formulate.

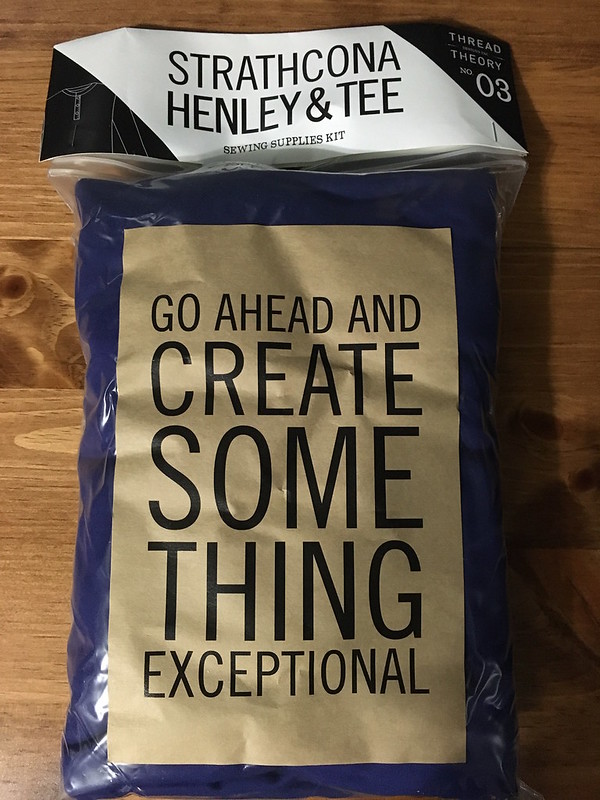
My BIL loves to wear t-shirts and also likes to have a pocket, which most RTW don’t have, so after making 2 Strathcona Henleys for Mark, I decided this is what I would do.

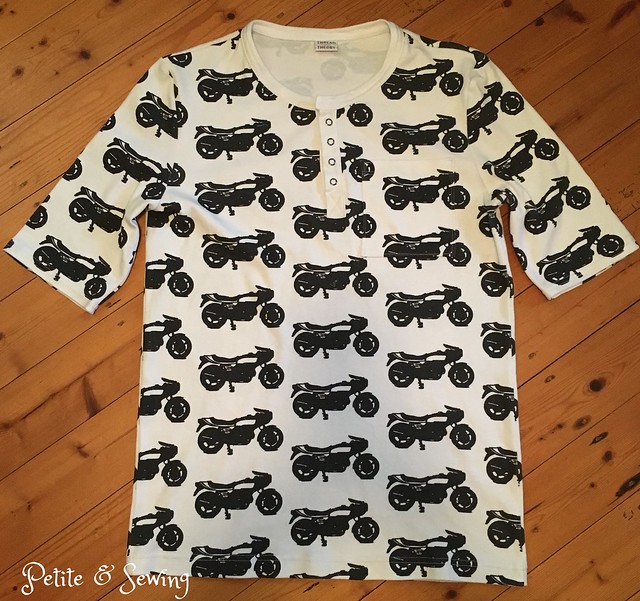
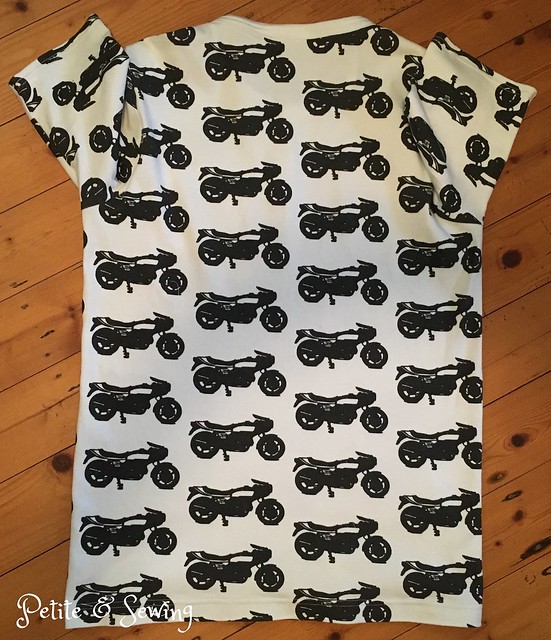
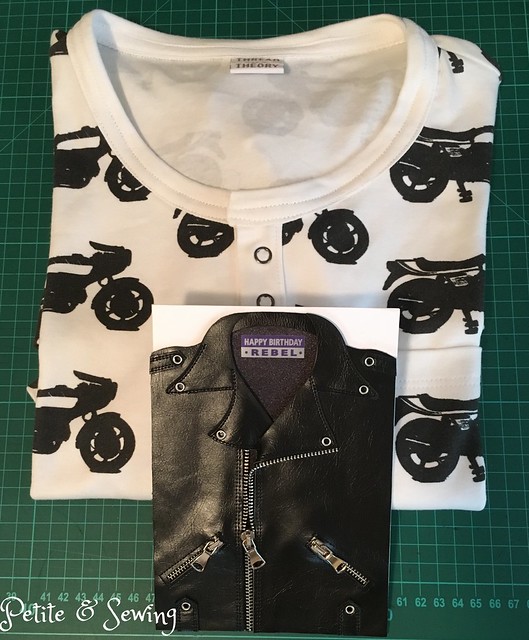
I found a picture of his 900 SS Darmah and then used the feature in PowerPoint to “remove the background” and with a bit of fiddling I had a pretty clear black and white jpg of this bike.  I uploaded it to Spoonflower and chose a half-drop layout and then ordered a sample in their Organic Cotton Interlock Knit.

This arrived just before Christmas and gave me time to think about exactly what I was going to do. So at the end of February I ordered the Ducati fabric as well as a metre of the plain Organic Cotton Interlock knit in case I wanted to use it on the Henley.

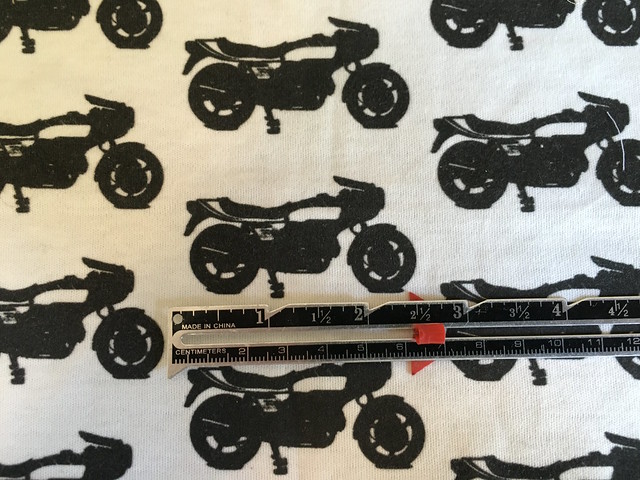
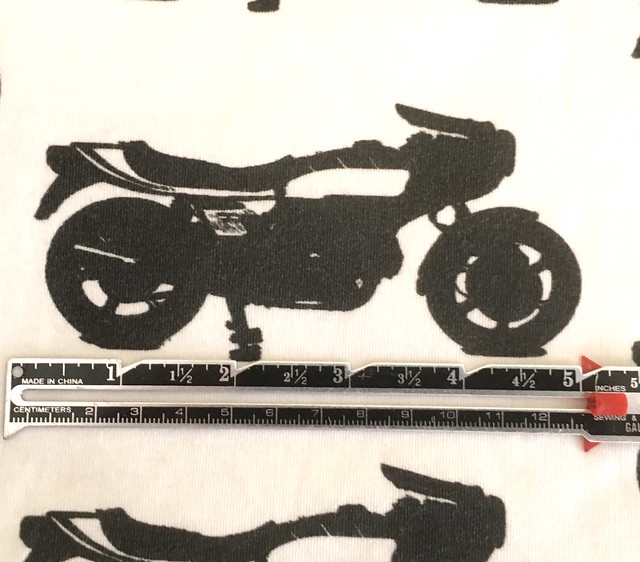
Now this is where I had a bit of a shock, the sample I received the bikes looked like this

and the real fabric they looked like this.

I did pop back onto Spoonflower to double check what size I had chosen, and it was the 5″ size.  I completely forgot to the check the size of the bikes on the sample because if I had I would have reduced the size of the bike to 2.5″ only if I could have spaced them out a bit more.

Now I wasn’t sure if this would look like a t-shirt or a night shirt but I decided to go keep going.

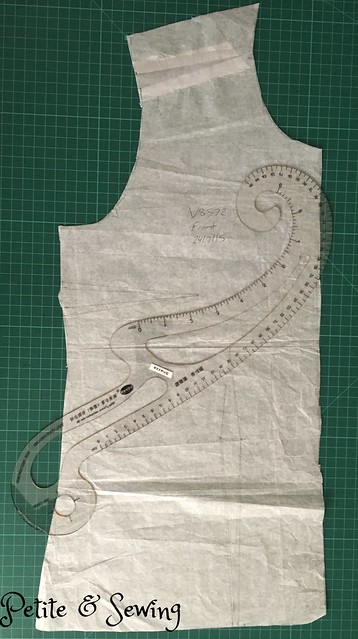
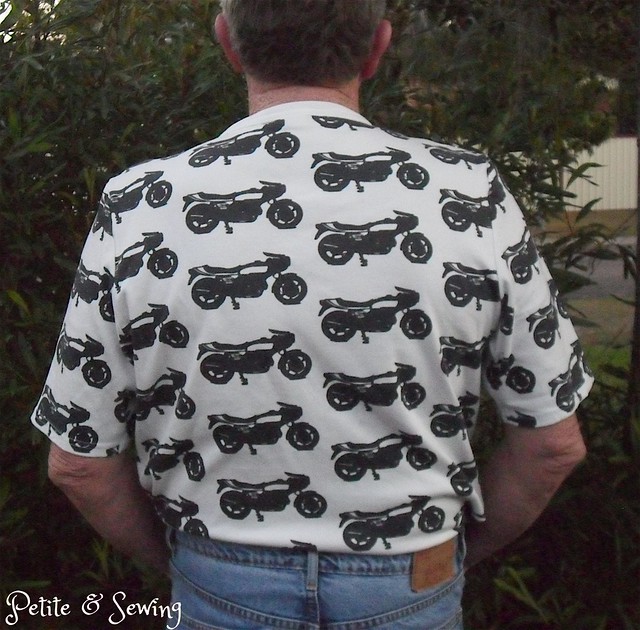
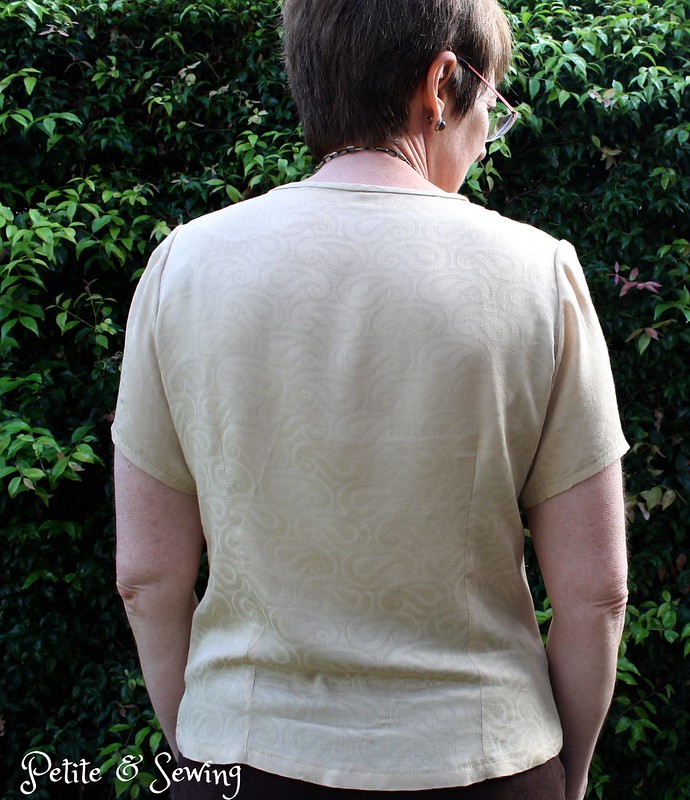
It did take a bit of head scratching to cut it out, Roscoe was locked outside and the fabric was spread out on the floor so I could get a better idea of the positions.  I soon realised that I would not be able to pattern match the sides so I decided to have a

  • full bike at centre front

  • a full bike at the side seams on the back.

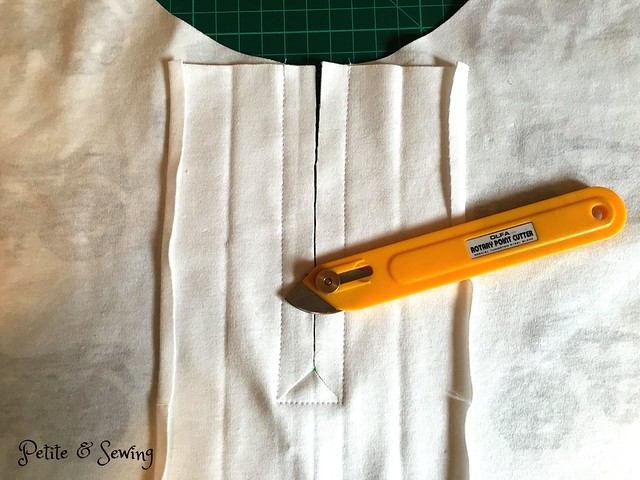
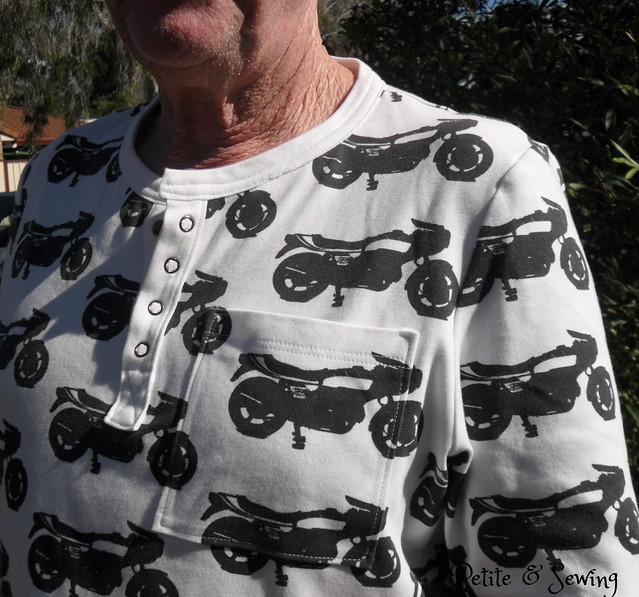
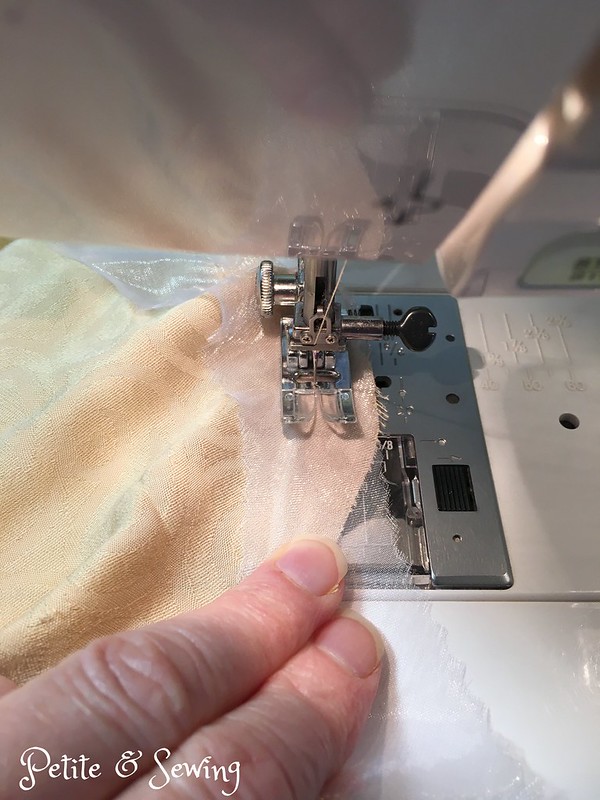
The first thing you do is the placket, so I chose to use the white organic cotton interlock knit for this and it went together very well with the help of the Olfa Rotary Point Cutter.

Next up was the pocket.  Now I wanted this to be invisible so I traced of a pocket pattern

and then laid it on the fabric to get the design and placement correct.

I’ve never installed a knit patch pocket before and found this great tutorial over at Seamwork.

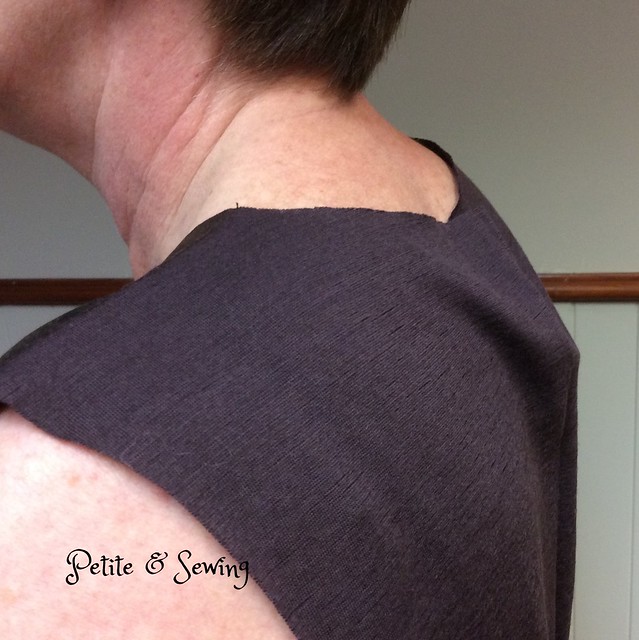
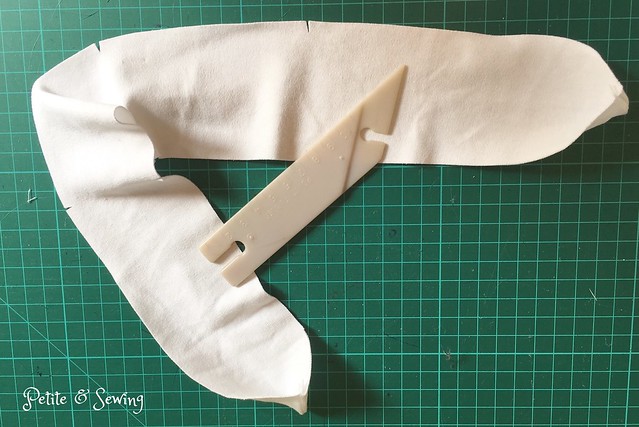
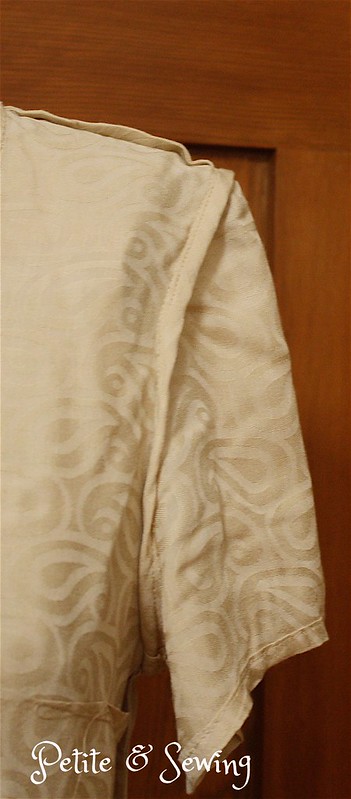
Next the shoulders and then the neckband.  I have tried the method that Thread Theory suggests but I just don’t like the overlocking on the neckband and this is the way I did the neck band on Mark’s but didn’t document it.

I sew the ends of the neckband together as per the instructions, but that is where it stops.

Then I pin the neckband to the neckline like this, and sew it in place.

Then I turn under the other neckband edge and pin in place and handstitch this in place, remembering to add the label.  Thinking about this it is like attaching a waistband.

oops I forgot the label!

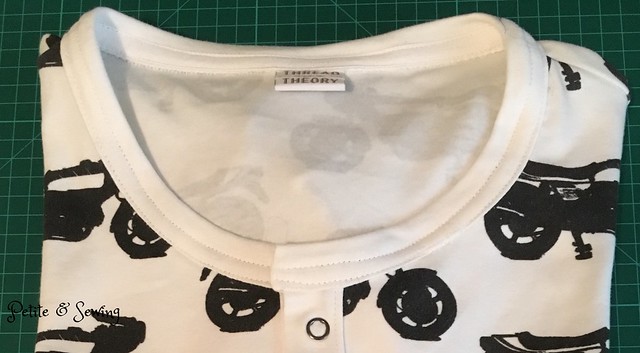
The final step is to add some twill tape to the inside neckband just like RTW and I did this for Mark’s Skiing Henley but found more information over at Baste + Gather and her T-shirt Neckline Twill Tape Tutorial.

The rest of the t-shirt went together very smoothly.

My final decision was what I was going to use on the placket:

  • black buttons
  • white buttons
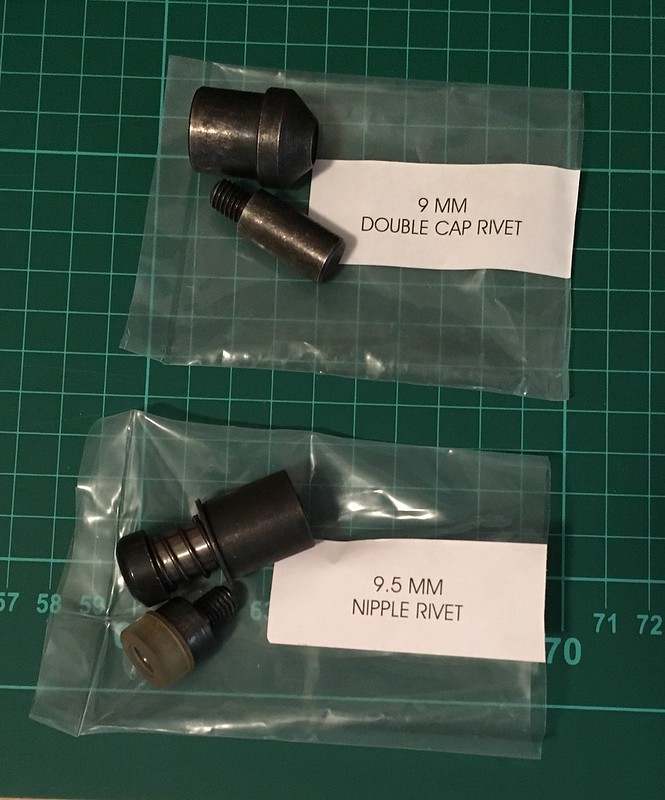
  • smoke open prong ring snaps
The snaps won and I got to use my new toy, the DK-93 snap press which you saw happening here!
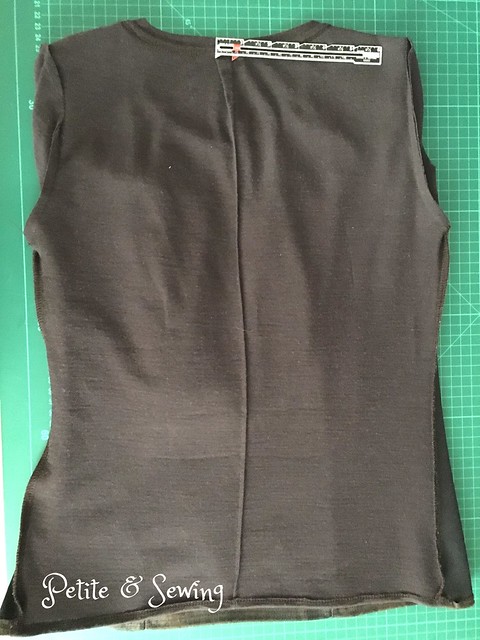
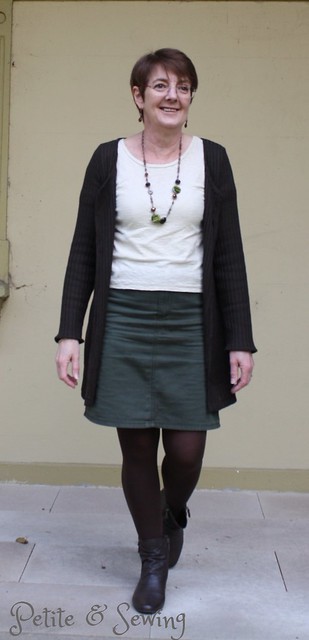
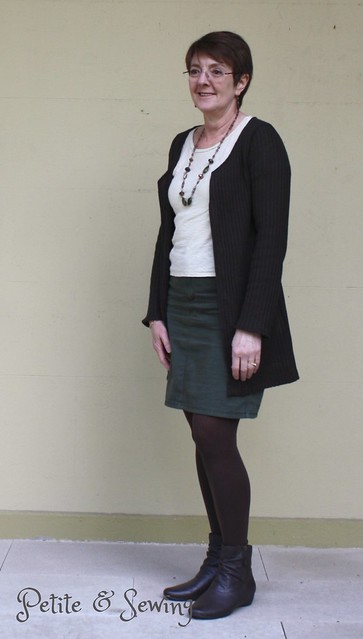
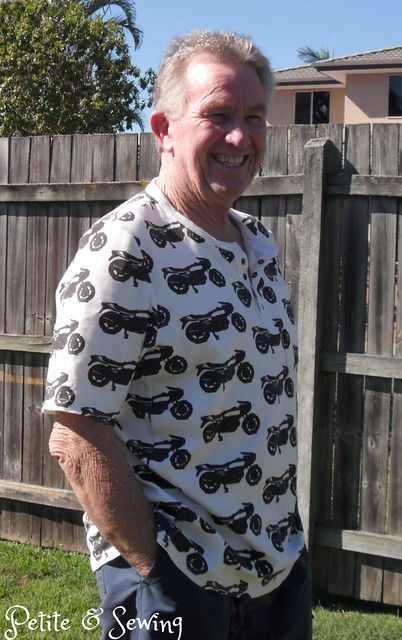
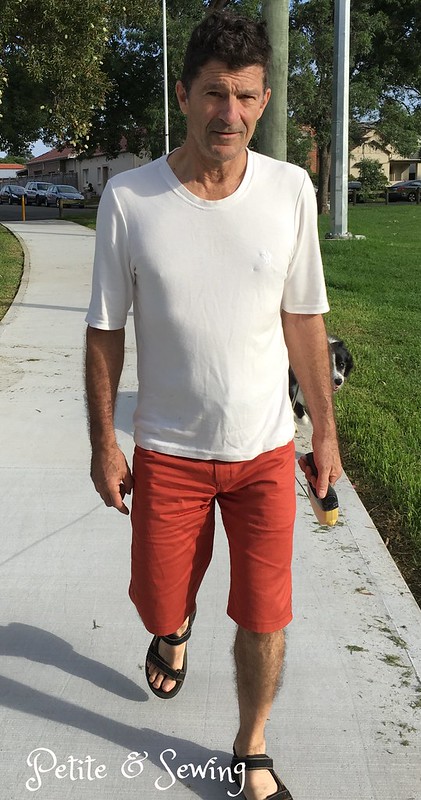
The problem with a surprise gift and your sister telling you not to make the t-shirt because you are so busy, is the Henley was a bit too tight for my BIL’s liking, it did fit him and in fact it is the best fit across his shoulders he has ever had but it was just a bit too close fitting for him to be comfortable in.

So it came back home with me so I could adjust the fit.

Luckily I had some left over fabric and manage to cut out two side panels of  8cm width that ended up in a point into the sleeve hem.

And look at this cool card I found when we were in Canada!

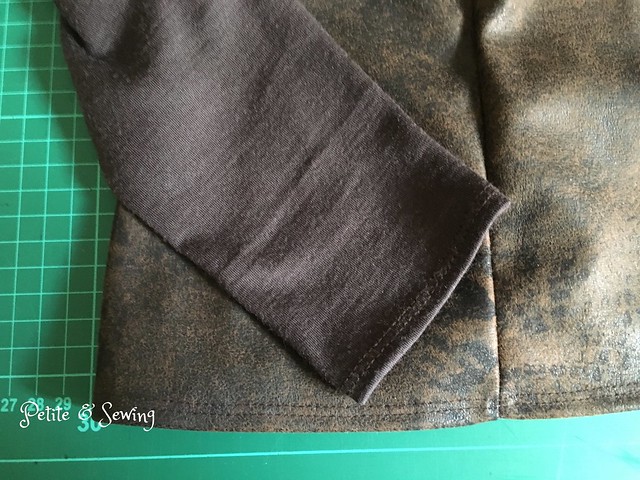
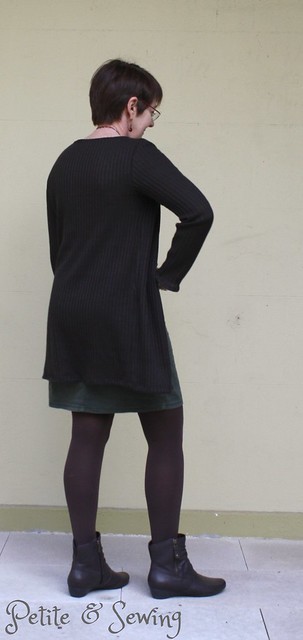
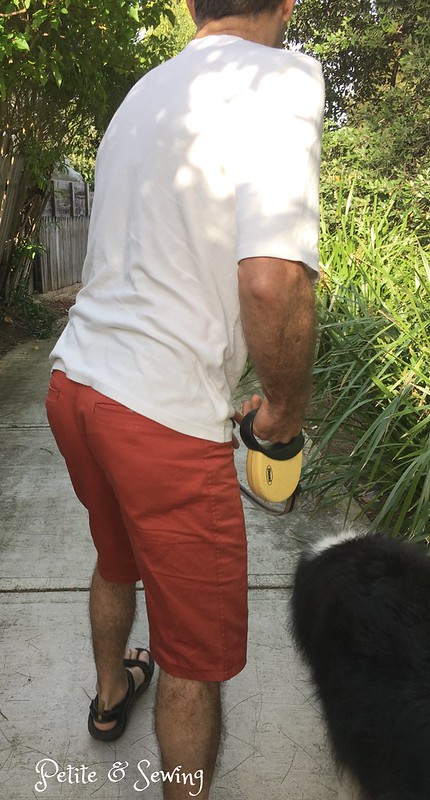
When he opened his parcel he thought I hadn’t done anything to his Henley until my sister showed him the pattern matching at the front side seams.

He is very happy with his Ducati Henley.

*****************
2016 Stash Out: 8.1 m
2016 Stash In: 18 m

Taupe shell top

I found myself very short of summer tops for work this year, and the paisley rayon’s I purchased recently had been earmarked for this hole in my wardrobe.

The first one is using my TNT top pattern, Vogue 8752 (OOP) which I am still fine tuning as my body changes as the years go by.

 The last lot of changes happened after a workshop at our ASG group back in July last year about armscye/sleeves by Anita McAdam who owns Studio Faro.

Anita suggested we bring/wear a top/blouse that we wanted help with, so I chose to use my TNT top and wore this yellow top.

Over the  years I have made a number of adjustments and it was the cream silk version that I made the round shoulder adjustment to my sleeve pattern and I was pretty pleased with that but I still get some stress lines around the armscye.

Anita suggested I also needed a forward shoulder adjustment and I have gone about it as follows:

1.  On the sleeve pattern I folded out 1.2cm on the back armscye and added 1cm wedge to the front armscye.

2.  I then did the corresponding adjustments to the front and back pattern pieces.

Front

Back

I didn’t expect this fabric to fray like it did after I put the invisible zip in, so

I did a Hong Kong finish on the seam allowances

and then did French Seams for the shoulders and right side seam.

I told a sewing friend that I used bias strips of organza to insert my sleeves, so thought I would try and explain it here.

*  After doing French Seam on the sleeves, I

*  took a 4cm wide bias strip of organza and placed this on the wrong side of my sleeve cap, starting at the dot and lowered the needle, with my machine on baste stitch, I put pressure on the bias strip as I stitched it around to the other dot,

and when you finish your sleeve already has a very nice shape to the sleeve cap.

*  and you can also use the basting stitches to put in more ease or reduce as necessary.

*  once the sleeve is in place, I cut out the silk organza bias strip.

Then to finish off the sleeve I added a Hong Kong finish to this seam.

and here is the completed top.

I’m not sure what is happening to the sleeve, even though I took out a wedge from the back armscye, it looks like there is still too much fabric.

Oh and I forgot to shorten the back darts, that would have given me just that bit more room at the back.  The pattern is now noted for next time.

Now off to work.

******************
2016 Stash Out: 6.1 m
2016 Stash In: 15 m

Winter Cardigan

During my trip back home from Tamworth back in May last year, at one of our stops I managed to loose my Merino cardigan that I had made back in 2011.

This was a great piece that could be worn open or wrapped around me to add an extra layer when it was necessary.

So the next time the Fabric Store had a sale, I was there to purchase enough Merino wool to specifically make another cardigan.

It then took me to January this year to finally get around to making it for our trip overseas.

I again cut the front drape halfway between the short and long versions but what I didn’t take into account was the different drape of the merino wool.

Short sleeves aren’t a good look under the cardigan.

The drape was not quite as long, so I couldn’t flip it over my shoulder and the sleeves were rather snug.

Thankfully the back covered my hips which was good.

So I added 3 small metal buttons to the upper chest on the left hand side

and sewed a thread chain about halfway along the other drape

so I could create another layer

that looks like this.  The side of the drape with the buttons on it is tucked into the back waistband of my skirt.

Even though the sleeves are snug and this is quite obvious with a short sleeved top underneath, when I wore it with long sleeves there are no other lines on the sleeves.

This was worn nearly every day I was away, it works with all of my tops and provided the extra layer I needed.

******************
2016 Stash Out: 5.3 m
2016 Stash In:  15 m

New knitting bag

When I can’t sew I take my knitting and have been using a large knitting bag for many years.

Besides it looking very tired it was too large for my trip overseas so when Andi Satterlund from Untangling Knots posted about Knitting at Parties, she shared a link for the perfect little knitting bag.

The Reversible Sock Knitting Project Bag  by Very Shannon.

I have quite a bit of the Vera Bradley fabric in my “bag stash” and have used it previously making a Spice of Life bag which unfortunately stays in the cupboard.  I’ve realised that even though I love the fabric I will enjoy it a lot more making accessories for my knitting.

I have used both the large floral and added the large border to add some interest to the side of the bag.

For the lining I used the smaller patterned fabric.

I cut a strip of the large floral and used the smallest Fasturn tube to make the cord.

This was the perfect size bag for my trip.  I did take the cotton facecloth that I was knitting and a skein of wool as well as 2 pairs of interchangeable needles for my circular needles for the knitting class I did at the Sewing & Stitchery Expo

The facecloth is now finished and although not perfect I am feeling a lot more comfortable with the “continental style” of knitting.

******************
2016 Stash Out: 3.4 m
2016 Stash In: 15 m

Shorts for the man

Every now and then I plan to make a garment for Mark and seeing I had already made him two Strathcona Henely t-shirts and had purchased the Jutland Pants from Thread Theory, I thought a new pair of shorts was in order.

Mark does own a pair of red shorts so I didn’t feel that purchasing this burnt orange would be too much except my sewing buddies keep telling me it is my colour.

I then had some fun finding some manly cotton fabric for the pocket bags, waistband lining and bias binding.

My madness is based on the fact that Mark has a 30″ waist and last year I found it extremely difficult to find pants/trousers in this size and as he prefers not to wear a belt it looks like I could have a new job.

So I cut out a size 30″ and then couldn’t make up my mind if I was going to do patch pockets or welt pockets.

Welt pockets won, but it has been a long time since I have done these and I’m glad his RTW shorts have the bar tacks at the end of the pockets as this has helped cover my overcutting.

Even though I wasn’t completely happy with the welt pockets I decided to still make these as I wasn’t sure that the pattern 30″ waist would be equal to Mark’s real waist.

All seams are flat felled and I have used bias strips for around the edge of the fly.

Again my sewing machine didn’t like the buttonhole so I have again used the tutorial I used for my Jeans.

I found this button in my button jar and think it works perfectly for these shorts.

Mark found the waist to be very comfortable but did comment that these are a slim fit in the legs.  So next time I will add a some extra width in the front leg and see how that goes.

This is at the end of the day.

Now the fabric for these shorts were counted in the 2015 totals, but I attended the Sydney Spoolettes Fabric Destash event last Sunday and donated the green/black mesh knit that you can see at the top left hand of the picture below.  This was purchased during our trip to the USA back in 2011 and now I can only see the black in it so I am very happy it has found a new home.

******************
2016 Stash Out: 2.9 m
2016 Stash In: 15 m

What happens when you travel

you have parcels waiting for your arrival at your accommodation!

Our first stop was at Fife, in Washington State which was 10 minutes from the Sewing & Stitchery Expo.

When we checked in the front desk has 3 parcels for me which I had ordered before leaving home and knew I would not be able to easily source them myself during my 3day stay in the USA.

Parcel No. 1
You know about the purchase of my Juki M0-1000, well I also learnt that like the Bernina oerlocker it has a number of specialty feet available.  I can purchase them here in Australia, however the cost is pretty high so for the cost of say 3 feet here, I have

but wait,

There are actually 8 feet,

  • Blind Stitch Presser Foot Part No. 40138091: (for Right Needle) for making blind hems.
  • Elasticator Elastic Metering Presser Foot Part No. 40138095: To attach elastic tape to stretch fabrics
  • Cording Presser Foot Part No. 40138099: For attaching nylon string or wire on edge of fabrics.
  • Piping Presser Foot Part No. 40138103: For sewing piping.
  • Beading Presser Foot Part No. 40138106: For attaching pearls and beading with overlock stitching,
  • Gathering Presser Foot Part No. 40138121: For gathering and sewing with differential feed
  • Universal Blind Stitch Presser Foot: For making right/left needle blind hems and flatlock.
  • Curved Beading Presser Foot: For attaching pearls, sequins and beading with overlock stitching
  • Now I need to do so some serious playing.

    Parcel No. 2
    This next parcel might seem a bit odd, but one of my Christmas presents was the Dk-93 Manual Snap Press which I just had to have after reading about it on Lena’s blog.

    So this parcel from Minkus Margo (at Etsy seller) was 2 sets of dies – a 9.5mm nipple rivet die and 9mm cap rivet die. This is the actual size of the rivets.

    Parcel No. 3
    Two pieces of 1oz HpyerD Diamond Ripstop in Moroccan Blue and Burnt Orange.

    The ripstop I purchased for my Minoru is not water proof and after reading about Morgan’s Denali Vest  over at Thread Theory I decided to place an order with Ripstop by the Roll and purchased enough of the blue for another Minoru and the burnt orange for a vest.

    Now I have them home, they are very light so my plans may change.

    I also dragged Mark along to Jo-Ann’s to have a look around and this is what followed me home

    Not my normal fabric, but a pair of Carolyn Pajamas will make me smile every time I wear them.

    Then we headed to visit family and friends in Canada, so two more Canadian suppliers packages were waiting for me.

    Parcel No. 4
    I have dabbled in bra making with a Watson and really want to make my own bras for various reasons.  I already have the three  current Beverly Johnson’s Bra Making Classes on Craftsy and had heard that her manuals were very good.

    Parcel No. 5
    I have made Mark two versions of the Strathcona Henley t-shirt by Thread Theory and Morgan had talked about this luscious Canadian-made 100% cotton interlock fabric so I thought I would purchase a kit to see what Mark’s thinks of it.

    Of course since I have returned home there were a few more packages I could have had organised but there will be a next time I’m certain.

    ******************
    2016 Stash Out: 0 m
    2016 Stash In: 15 m