I have only completed one Marfy garment before so I thought it would be a good idea to make up a wearable version of Marfy 1913 in a similar fabric to the silk I purchased for this blouse.
First of all I made it up without any of my normal changes in some lining fabric that I have a lot of and soon realised I needed to lower the front neckline by 2cm as it was choking me.
The next problem was the back, I had these drag lines and I wasn’t sure where they were coming from.
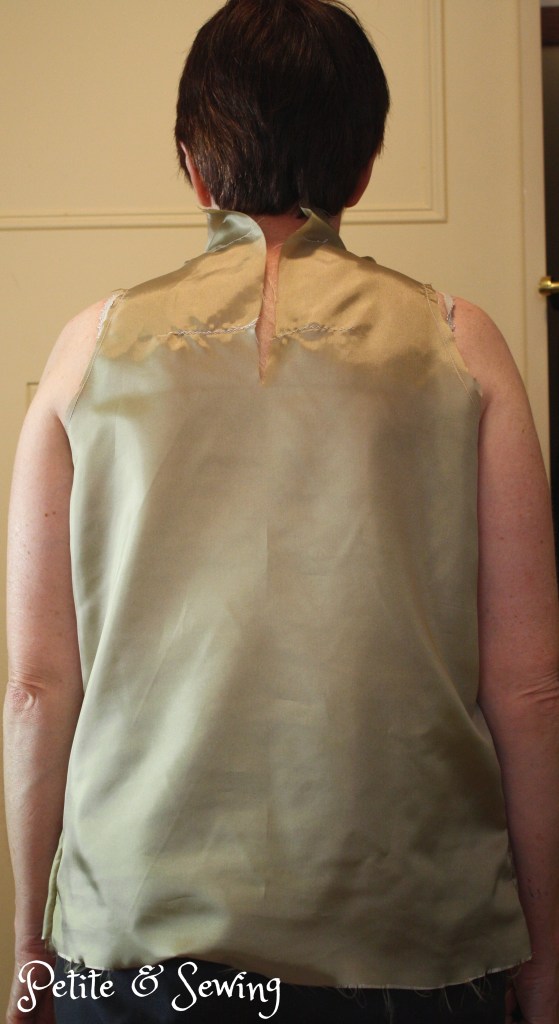
Thankfully I had an ASG meeting to attend at The Remnant Warehouse and knew one of my sewing buddies would be able to help. Wendy quickly pointed me in the right direction and I now know that for this pattern I needed to do the “Sticky Out Shoulder Blade” adjustment (Fit for Real People, page 125 number 3) as well.

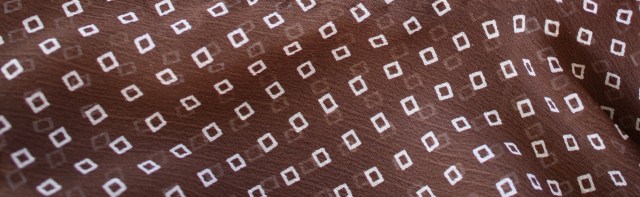
This brown Georgette with off-white squares has been in the stash for a long time, so after putting it through the gelatine mix I started to work on this top.
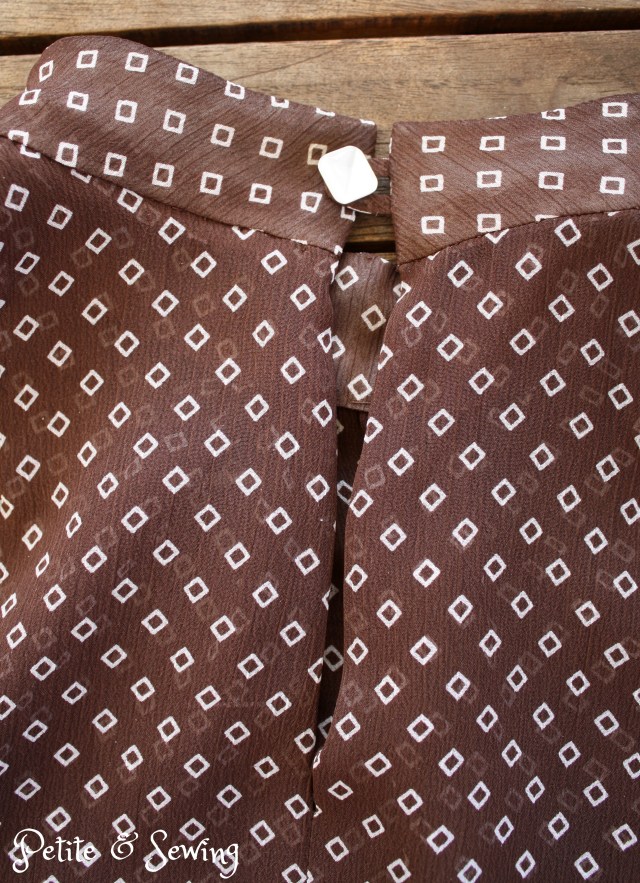
Over at the Marfy sew-along, Leisa had been given permission from Susan Khalje to post her wonderful tip on how to do the back slit, which is essentially a dart!
French Seams have been used for the shoulder and side seams.
For the collar I used Pro-Silk Organza from Fashion Sewing Supply for the interfacing of the collar (both upper and under) and added a self fabric rouleau for the button closure at the back.
When I attached the collar to the neckline, Leisa suggested that we machine stitch to the gathering and then hand stitch the gathering section. I did this as my fabric was a bit stiffer (without the gelatine) than the silk and I wanted the gathers to fall softly, which I think they do. I then pick stitched the collar in place from the right side.

To finish the armholes I cut 2.5cm bias strip of Sun Silky as Leisa explained under the Couture heading, and then pressed this in half, matching the cut edges right sides together, machine stitched this in place and then turned the bias strip to the wrong side and catch stitched it in place.
My hem length was another challenge, I added 8cm to the pattern and then cut off 6.5cm and realised the top was too short for the elastic to be used so this version has no elastic and will only be worn tucked in as it is a bit full around the hips for my comfort level.

After wearing it today, I have realised it needs a couple of extra changes e.g. lower the armhole, add the length back to try the elastic at the hem and add some extra to the armholes to cover the bra straps, but for this version I will add some strap keepers!


I am still very happy with this blouse and was surprised at how well it matched this skirt, so I think this will be my one of the two wild card for SWAP 2014.
******************
2014 Stash Out: 3.2m
2014 Stash In: 24.25m

Beautiful blouse! I'm so impressed how well your alteration worked to achieved a fantastic fit! You've motivated me to get going on my SWAP too.
LikeLike
Lovely – can't believe what a difference the adjustment made, beautiful top!
LikeLike
Lovely. I have make my first version but haven't posted about it yet. I didn't use the collar, just added binding. And didn't put elastic into the hem. Next version I will give the collar and the elastic a try. And I forgot about the back \”dart\” and cut a back seam. Works well though. I haven't worn mine yet as I used a hook and eye for the closure and it won't stay closed! Need to change that to something else. Job for today 🙂
LikeLike
Your Marfy top is beautiful. I really like the fabric you selected. I must try the gellatine trick.
LikeLike
What a difference that alteration made! It looks wonderful!
LikeLike
I'm a great believer in test garments and muslins – especially if the plan is to make a stunning silk blouse eventually – the investment in time is worth it. And your test garment is gorgeous – and very wearable, so it is win/win. Well, actually – more than wearable. Interesting about the drag lines – they always comes from somewhere. The alteration has made a world of difference to the look.
LikeLike
I saw your blouse on Leisa's blog – it's a real stunner!!! And what a fabulous adjustment is that sticky-outy-shoulder-blade, hehe, love it! I tried making sense of that crazy dart/slit – it seemed like something you have to do whilst reading the instructions for it to sink in! I'm hoping this will be a wardrobe regular for you 🙂
LikeLike
Very classy, and in your colours of course!
LikeLike
Lovely flattering blouse, beautifully made as usual. Perfectly you.
LikeLike
Very nice style and colour! Love your couture details – thanks for the references.
LikeLike
I'm seeing lots of great versions of this top and yours is another winner. I really love how easily you incorporate your fit changes – I'm still working toward that level of proficiency 🙂
LikeLike
Wow, the adjustments have made a big difference and it looks great made up in the \”off-white squares\”. Beautifully stylist with the skirt too!
LikeLike
Pretty fabric choice for this classic top – just lovely!
LikeLike
Lovely top, and perfect with the skirt. It looks so stylish with the adjustments you made. Fit makes all the difference.
LikeLike
You look so stunning and put together. Love the top on you, love the fabric, and love your explanations of fitting changes.Well done!
LikeLike
You may have pointed out how I can make this work for me. I left off the collar. Maybe with a neck adjustment and the back adjustment, I won't feel suffocated.Great alterations have definitely paid off in a great fitting and looking blouse.
LikeLike
Love it – very flattering on you.
LikeLike
That top is so you Sharon.
LikeLike
Classy, feminine top . It really suits you and makes a lovely outfit with the skirt.
LikeLike
Beautiful top – and I love seeing the close-ups of your sewing!
LikeLike
Another beautifully sewn top. The colour suits you so well. I was tempted to try the Marfy Sew along but with renovations going on here, I decided I'd better not commit. I do want to try Marfy one day.
LikeLike
Your post is so informative, Sharon, that it is bound to help anyone who wants to make that Marfy top. Your thoughtful couture-level methods really make a difference. Congrats on doing such a fine job.
LikeLike
Wonderful top and I love your fabric! Seems like gelatine has had a great workout this week. I must check out that slit tutorial that you mentioned. You did a great job on the gathers.
LikeLike
That was a quick sew! Your sticky out shoulder blade adjustment is the same as my fat back adjustment. LOL.
LikeLike