#OWOP – One Week One Pattern – Self Drafted TNT Skirt

I have again signed up for the One Week, One Pattern challenge hosted by Jane where we wear a single pattern for every day of the week.

Before I committed I did a count of what patterns I had used the most of, and it was a close call between KS 3740 and my Self Drafted TNT Skirt.  I did contemplate using both patterns for the week, but bad laundry management didn’t allow this to happen.

So this is how I have worn my Self Drafted TNT Skirts for the week.

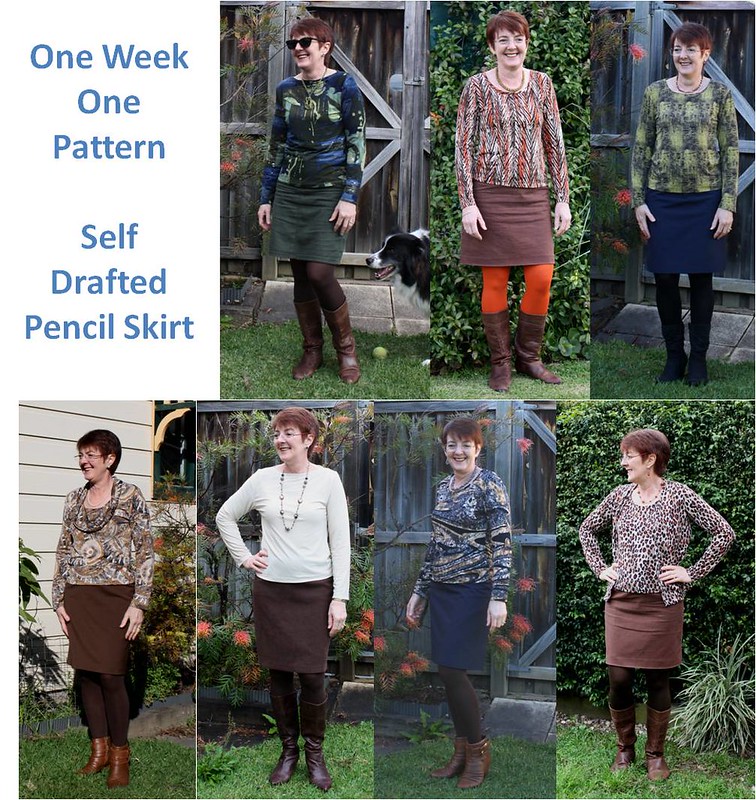
Green jean styled skirt:
I love this skirt but seriously need to get some more tops to go with, especially for summer!

Brown linen skirt (pre blog):
As you can probably tell from the pictures, this skirt is on its last legs, you only have to look at it and it creases and has been moved from the work wardrobe to weekend wear.

Navy wool skirt:
This skirt has turned into a workhorse over winter and I look forward to getting more wear out of it during the warmer months.

Brown wool skirt:
I am in two minds about this skirt, it is a lovely fine wool, but I feel it needs a bit more structure for a skirt.  I plan on making another at some point as I still have quite a bit of this left and plan on underlining it to see if that will give it the look I am after.

Brown suede skirt:
You can’t crease this skirt, it is brilliant – just wash and wear and I can roll it up into a tiny ball in a suitcase and you are none the wiser!

The navy wool skirt and brown linen skirts both got repeated to finish off the week.

This pattern has been a real workhorse for me, it has been used to make skirts, check the fit other skirts (Vogue 1247) and even dresses to make sure the hip curve or lack of is the same!

Building a Wardbrobe from Scratch – Part 2

It was interesting to note that at the end of Step 7 where I left you last that if all the garments were made I could have at least 2 weeks of outfits without repeating a combination!

Step 8 is adding 2 tops and a necklace and this is where we can bring in a patterned fabric. Again these items are already in my wardrobe, my yellow peplum top, the Blue and Gold swirls t-shirt and the navy necklace


Step 9 adds three pieces, a skirt, top and shoes, and these three pieces already live in my wardrobe.  My suede skirt, the navy/gold/brown silk blouse and another pair of Circa Joan & David sling-backs in brown.

Step 10 is the addition of a casual jacket, t-shirt or blouse and casual shoes. This time I have added my Minoru jacket, blue/brown/green boatneck top and I will have to go shopping for some casual brown shoes.


Step 11 is where we add a complete outfit for balance and accent, so I have chosen to add my Brown denim skirt and brown waterfall cardigan that are already in my wardrobe.  The coral blouse is one to make and I have just ordered the perfect fabric.

Step 12 is adding a winter coat, boots and a scarf.  Can aubergine be a colour of coral?  I have the perfect fabric for a winter coat and do have the pattern ready to go!  I know I don’t want a brown or navy coat but coral or yellow is taking a bit too wild for me.  I have the boots but will also need to knit the scarf/cowl.

Step 13 is all about more accessories and Janice does suggest a bracelet and brooch. I am not a bracelet person, I wear the gold chain bracelet that was in the first round of accessories all the time.  I do have some brooches and do dig them out every now and again.  I could also do with an evening bag so I have included this in this round.  The necklaces and earrings are already in my jewellery box – Smokey quartz necklace and earrings  , Brown beads with some double spiral chain maille, Blue,Grey rope and earrings

There are a lot of garments and accessories in the group above and there are still a few steps left to add.  I have been surprised at how much of this is in my wardrobe already.

Following Alexandra‘s idea I have also decided to keep a separate list of garments that I need to sew, knit or purchase and this is what it looks like so far.

Has anyone else got this far along with their planning, please share in the comments.

Building a Wardrobe from Scratch

I have been a follower of Janice’s over at the Vivienne Files for years and a couple of months ago she started a series about how to build a wardrobe Starting from Scratch.

When I saw Alexandra’s plan I thought it would be interesting to see how it would work in my wardrobe.

Now I do have quite a co-ordinated wardrobe as it is, but there are some major holes and I thought I would use this to see what garments I need for the coming spring/summer.

First up I had to choose my colour scheme, the two neutrals were pretty much a given, milk chocolate brown and navy.  Next was the two accents, well yellow is a colour I love and for the second one I have chosen salmon.   Then Janice suggests a variation of white so that is my cream that will function well as a blouse or t-shirt.

Most wardrobe planners tell you start with a suit, however Janice has started with a pair of dressy pants which takes you on a completely different journey.

Pants are the one garment that I am still working on, and later this month I will be attending Louise Sparrow’s “Louise Pants that Fit – Create your own Pattern” at the Australian Sewing Guild Convention.

Step 2 is comfortable pair of shoes, it has to be my Circa Joan & David Calalilly Pumps, I just love these shoes!

Step 3 is adding a cardigan/jacket or t-shirt or blouse, in the same neutral.

Thankfully I have some lovely dark brown wool knit to make up a twin set for this Step.

Step 4 is adding jeans and a blouse!

I have both these pieces in my wardrobe already, the cream boat neck t-shirt and brown denim jeans.

Step 5 is all about accessories, this is an area that I know I need to work on, although I have managed to accomplish Round 1 Accessories with my leather bag that is used every day, silk scarf purchased in China, my everyday watch and earrings.

Step 6 you add another scraf and two accent tops, here come the yellow and salmon tops.  I’m not sure why but I have realised that I haven’t worn many scraves this winter, but I would love to find one that incorporates my colours.

I couldn’t remove the necklaces from my pictures, so please ignore this round.

Step 7 is where we bring in the 2nd neutral with a jacket/cardigan or skirt/pants and some more shoes.  This time I have chosen my Navy Marfy Skirt and do plan on making the Marfy jacket to go with it.  The shoes are a pair of Circa Joan & David slingbacks in navy that are also in my wardrobe.

This is good time to assess if I am heading in the right direction with my garment and colour choices.

I’m not in love with the style of the brown top, but I know that I can make it my way so I just need to ignore the silhouette at the moment.  I didn’t do the grouping with the brown jeans but you can see how easily they would fit in.

Have you been following Janice’s posts and looking at your own wardrobe, I would love to know if you are and how you are going.

This about a third of the way through so I will be back soon with some more steps.

Chain Maille – Captive

I am intrigued by Chain Maille and the different weaves and designs you can achieve using jump rings.

I have made one previous necklace using the Byzantine Weave and at Zilchbeads they had on display a Captive Inverted Round Maille weave necklace that I was curious to learn.
This time I took this fabric (it hadn’t been made into the top then) and chose the antique jump rings and some very bright orange beads, which interestingly enough are toned down quite a bit when captured.
The necklace is a combination of stringing and Chain Maille and once you get into the rhythm it goes together quite quickly.
  
Only this last weekend I managed to make the earrings to go with it, I had pinned this captive earring and then did my own take on it.
and here is what the full set looks like.

Now to work on some spring/summer styles.

I’ve got pockets! Make a Garment a Month – August completed!

The track pants I made back in April have been in high rotation with the cold winter mornings we have been experiencing.

It was time to make another pair!

I found this useful tutorial that helped me draft a slanted pocket and then I found this great fat quarter in my stash for the pocket bags as I didn’t want the extra bulk of 3 layers of fleece on my thighs.

To stop the pockets from bagging I used some cotton twill tape along the edge of the pocket when I attached them to the front pant piece.

Are we going for a walk?

Hurry up Mark!

Next time I will make the pocket bag a bit bigger, but at least now I can carry my phone and keys with me when I take Roscoe for his walk.

******************
2014 Stash Out: 26.75 m
2014 Stash In: 45.75 m

A new top!

I have a new top for the wardrobe, it is another version of KS 3740 which I have made quite a number of times already.

For this version I have:

  • added a FBA of 1.5cm.
  • reduced the cuff width by 1cm
  • removed 1.5cm from the shoulder seam

These changes will now be in all future versions.

I purchased this fabric from Kerryn’s Fabric World back in July 2010, so it has been slowly maturing in the stash.

The neckline is raised by 4cm from the original neckline and I have again played with my coverstitch machine to do the neck binding.

Not much else to say about this top so here are the photos.

No doubt you will see more of KS 3740!

******************
2014 Stash Out: 25.45 m
2014 Stash In: 45.75 m

Activewear – Avocado Hoodie

I did it, I have sewn 5 garments this month, this is a first for me!

This is my last piece for the Mini Wardrobe competition, it is the Avocado Hoodie by Seamster Patterns.

With my other two tops being sleeveless, I thought I had better plan a layer piece and the hoodie seemed the perfect thing to make as I could play with the panels for some colour blocking.

The patterns is another downloadable one, and I know putting it together and tracing it off was one of my activities during my week at Thredbo last year 🙂

I traced off a Size 0 and then did the following adjustments:

*  1cm gaposis tuck for the front neckline and 1.5cm round shoulder adjustment on both back and front pattern pieces

*  1cm sway back (not sure why I didn’t do the extra 0.5cm)

I again used the brown Stella Cotton Elastomeric 10% Spandex that I have used for all the other pieces as well as the fabric leftover from this top for the hood lining and side panels.

Last Saturday at my ASG meeting I started to sew this hoodie and finished it on Tuesday night.

The directions are very good, except I had some difficulty with the sleeve cuff. The cuff seam is to meet the notch on the sleeve, however if I did this my cuff/sleeve twisted, so my cuff seam is 1.5cm from the sleeve seam and placed towards the front of the sleeve.

I wanted the hood to be a bit warmer, so I added a lining, cutting out another hood in the top fabric, sewing them together and then top stitching around the edge to keep it in place. I like the pop of colour near my face.

Are we going for my walk?

Okay let’s go!

I am thrilled with the way this Mini Wardrobe has come together, I don’t have to subscribe to the black pants that you find in RTW!

I am also taking this piece as my official completed garment for July!

******************
2014 Stash Out: 24.1 m
2014 Stash In: 45.75 m

Activewear – Sports Top

Now for the 4th piece in my Activewear Mini Wardrobe.

Back in December, Sandra (Dilliander) one of my sewing buddies introduced a few of us to the Lekala Patterns as she had their Sports Vest with her at our sewing day and was very kind in letting quite a few of us try it on.

The interesting thing about these patterns is that you input your own measurements into the order form and for $2.50 + 50c for the addition of seam allowances you have a pattern that uses your measurements, even some of your basic adjustments i.e. high waist can be specified.

Needless to say that I soon visited the site and downloaded my own Sports Vest to see how it compared to the BWOF or even the Big 4 patterns.

Again, it is another downloadable pattern.  Once I had taped it together and traced off the pattern I did do my standard sway back adjustment.

The fabric for this top is again a combination of the brown Stella Cotton Elastomeric from Standard Knits that I have used for the other pieces for the main front and back panels and the navy Supplex that Sandra and I purchased from Metro Fabrics earlier this year for the side panels and the two yoke pieces.  I have again used the leftover fabric from this top for the neck and armhole bindings.

I had fun again with my Coverstitch Machine:

*  Used the knitbinder to attach the neckline and armhole bindings.

* Put the variegated thread in the looper for the two princess seams.
* Back to brown thread in the looper for the reminder of the hem.

and now some more yoga

I am very happy with how this pattern has turned out, it is hard to tell in most of the above photos, but the top one does show the fit and maybe a small FBA will get rid of those wrinkles, but pretty good straight off the PC.

Today’s photo shoot had hubby cut my legs of for most of the photos, so back to the drawing board and the digital remote tomorrow for the final garment.

******************
2014 Stash Out: 22.2 m
2014 Stash In: 45.75 m

Activewear – Gym shorts

Here is my 3rd piece for the Activewear Mini Wardrobe, and it is my second pattern from Fehr Trade the  Duathlon shorts

The pattern includes the booty short, biker or capri length and the capri is the type of short that I prefer to work out in, although this winter weather is making me wonder if I should also get the PB Jam Leggings but I will see how I survive for a while first.

These are also made out of the same brown Stella Cotton Elastomeric as my Yoga Pants and I have used some leftovers of this top for the side pockets.

I cut out a size XXS as per my measurements, again scooped the crotch curve lower and after reading a number of reviews I also straightened the hip curve.

Because of the patterned side panel, I only used the brown thread for the cover stitching on all the seams.

The pockets look so tiny, however my iPhone 5 fits very snuggly in there.

How did that speck of grass get there!

Now for some action shots:

For once hubby didn’t cut my head off 🙂

I am very happy to report that I have finished the sewing of the 5 pieces, so I will be back again tomorrow with the 4th garment.

******************
2014 Stash Out: 21.5 m
2014 Stash In: 45.75 m