Cardigan – BWOF 04-2010-117

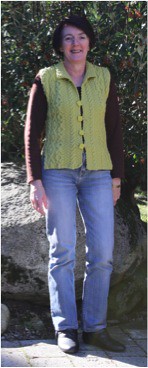
This was supposed to a quick project and I have evidence of it its initial construction back in September 2011, not so quick!

My stumbling block came about when I tried to use my Coverstitch to stitch down the very thick seam allowance along the band edge due to the thicker cotton knit and interfacing I used, I ended up with a very thick seam here.  After spending quite a few hours trying to get the tension to work, it was then left for time out on my sewing table.

So the other weekend it was packed with this top and taken to my guild meeting.

When I was in the USA last year, I purchased a number of different sewing machine needles and I thought I would have a play with the Schmetz Drilling needle to see how it would work on this band.

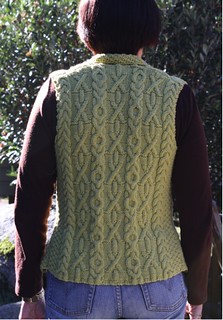
I used two matching thread colours and a olive colour for the 3 threads and I am very happy with the way it has turned out.

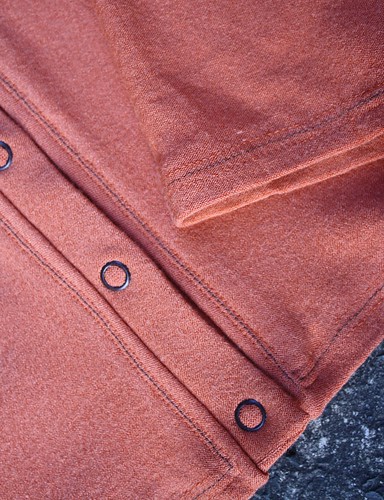
I then used my Coverstitch with the triple needles to sew the hems.  Unfortunately the stitches disappeared into the fabric as it isn’t interfaced, but you can still seem them just.

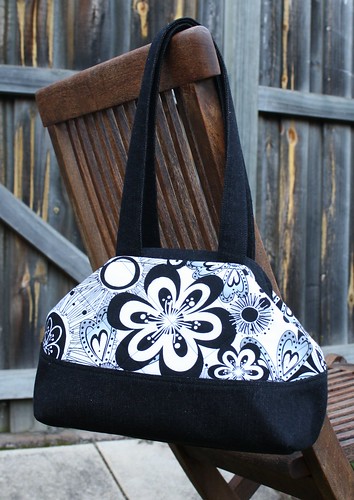
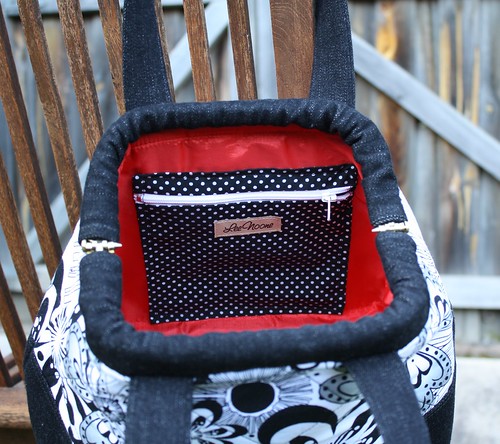
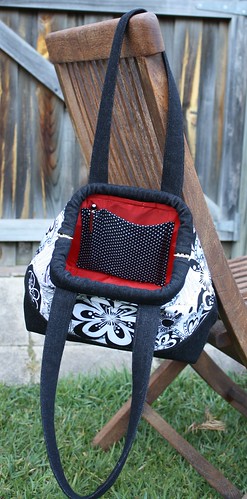
Last weekend was the first time I have been able to add the Snap Source Espresso size 16 Open Prong Ring Snap Fasteners.

For some reason I didn’t do my usual adjustments to this pattern, and the only change I can see that I did do was to try and reduce the sleeve cap height.

This was a toile and after seeing these photos I can see I need to do more pattern adjustments e.g. reduce the shoulder length, do a better job of the sleeve cap height, add some width to the sleeves, they very snug with a long sleeve top underneath, and those pull lines?

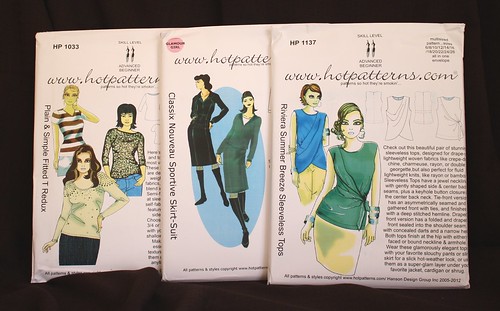
I’m heading to the ASG Convention in Adelaide at the end of the month and have booked myself into the Fractured Knits Cardi workshop and I plan on using the Jalie 2566 cardigan, so it will be interesting to see the differences between the two cardigans.

I love cardigans but have found it difficult over the last few years to get them at the length and colour that I want them to be, so this is a pattern style that I really want to have as a TNT.

Cosmetic Bags

On Friday night I realised that I needed something to take to my ASG meeting the next morning and seeing I have so many garment ideas running around my head I have ended up with some paralysis as to what to cut out next.  This is when I spied this project that had been sitting on my sewing desk since earlier this year.

I purchased a kit for a Laminate Cotton sew-along thinking it would give me some practice for sewing my rain coat trench that is one of the garments on my sewing list.

I chose the Orchid Fiona Panel by Riley Blake Designs.  The kit was packed up so nicely with samples of the different cotton laminates, a Wonder Clip as well as the fusible Pellon, zips, cord and cord holder to make the 2 cosmetic bags and a sunglasses case.  I cut out all the pieces on Friday night and fused the Pellon to the cotton laminate – on the ironing board I had the Pellon face up, the laminate cotton on top and a muslin press cloth on top, iron on cotton and no steam and it worked perfectly.

I used a size 14 needle and a Teflon foot for my sewing machine and normal Gutterman thread for the construction.  All pressing was done with a dry iron on cotton setting and my muslin pressing cloth.

Here is the completed set:

The larger cosmetic bag showing the interior:

The smaller case showing the interior:

This was a good quick project and I am surprised at how well my travel sized bottles fit in them!

********************

There were a couple of questions on my last post about KS 3740.

shams – the neckline is the cowl from this pattern, it falls very softly in this fabric so is hard to see it in any detail.

mary – I do a round shoulder adjustment which moves the shoulder seam 1.5cm forward and when I lined up the sleeve head with this point the cap height of the sleeve is not in the correct place causing my sleeve to twist.  I normally place the sleeve cap notch 1.5cm behind the shoulder seam then the sleeve cap height is in the correct position and my sleeve doesn’t twist.   I hope that makes sense.

At last …

I managed to spend some quality time with my sewing machines on Saturday at my ASG Group, working on 2 UFO’s that have been staring at me for a while now.

The first is another version of KS 3740, I love this pattern and when I purchased this fabric this was the pattern I had in mind for it.

This top was cut out and sewn back in May, but when I tried it on to find the hem length, I noticed the sleeves were twisted, so it has been languishing on my sewing table waiting for me to unpick the 4-thread overlocking I had used to sew the sleeves in.

So on Saturday the sleeves were re-sewn, and the hems levelled and coverstitched in place.

Now to add the finishing touches to my cardigan, back soon!

More Spice of Life

Over at PatternReview they have just held a 2 week contest challenge to make a handbag between 1 and 15 August.

Now when I showed Mum my version of this bag, I had a request for a black and white one for Christmas, but seeing it is Mum’s birthday this month the opportunity to make her bag earlier was perfect timing.

Thankfully I had been on the lookout for black and white fabric ever since Mum had said she would like this bag and had purchased 2 fat quarters at the Craft and Quilt Fair at Darling Harbour in June.  I already had the Ghee’s Tubular Frame from a joint order that I placed with Maria.

My main challenge was then to source some black fabric for the contrast for the bag and then remembered I had some black denim left over from the jeans I made.

This bag uses Matilda’s Own Bag Batting which makes the bag quite stable by itself, however one of the requirements of the competition was that interfacing had to be used.

So I fused interfacing to the Sun Silky that I wanted to use for the lining to make it more durable,

As you can see I don’t like a dark interior in bags, you just can’t find anything.

This bag pattern goes together really well and surprisingly quickly.

I did use a Jeans 110 needle for all the denim sewing and it all went very smoothly as when you sew on the tubes for the frame you are sewing through some very thick layers.

This is the finished bag,

The zippered pocket with my label on it,

and for the other pocket I divided this for Mum’s phone and a space for her to carry a  pen.

The bag was wrapped and posted to Mum last Wednesday and I was very surprised when I got a phone call on Thursday night from a very excited Mum to say that my parcel had arrived and she was absolutely thrilled with her bag.

I have entered this bag in the PatternReview challenge and my review is here for those interested.

My HotPatterns have arrived!!

I’m pretty sure that in all the excitement of Winning this years Stitcher’s Guild 2012 SWAP I forgot to mention that the first prize was $100 worth of HotPatterns.

It did take me a while to select these and I have just received them (well after 3 weeks holiday) and here they are:

  • Denim Diva Biker Babe Jacket
  • Artful Dodger Virtue Dress
  • Weekender Chilled-Out Sweat Suit
  • Weekend It’s a Wrap Top and Dress
  • HP 1033 Plain & Simple Fitted T Redux
  • Classix Nouveau Sportive Skirt Suit
  • HP 1137 Riveria Summer Breeze Sleeveless Tops
This pattern line is completely new to me so I will be interested to see what changes I need to do for the fit I like.
With all the Spring/Summer fashions that are appearing at present, what will I make first the:
  • Weekend It’s A Wrap Dress, or
  • Riveria Summer Breeze Sleeve Top with the tie front?
But first I need to finish up a couple of UFO’s Facebook smileys

Shona Vest

I picked up the Trendsetter Yarns Shona Vest and Mitered Skirt knitting pattern and wool whilst I was visiting Puyallup last year and I did start to knit it during our trip especially during the long flights.

I finished knitting the vest late last year and then realised I had forgotten the buttonholes (this is my first knitted garment that includes buttonholes and seeing the notes for the buttonholes were by themselves at the end of the pattern, I thought like a sewer, you do them at the end, how wrong was I).  I wasn’t going to undo all those cables for some buttonholes, so I had to work out another way to close the vest.
Then the instructions told me to block the vest.  This was another first, I have knitted a few garments but I realised with all the cables that this vest would need to be blocked and of course this made me delay even further, and when I did bite the bullet and block it I couldn’t figure out why I was so reluctant!
I purchased the buttons separately directly from Jane Slicer-Smith when I saw her at one the Craft Shows in Darling Harbour and for the button loops I plaited 3 strands of wool together.

I am very happy how this vest has turned out and will work quite well into my wardrobe.

The "Audrey Dress"

I downloaded this pattern when The Selfish Seamstress made it available after seeing her version for the Little Black Dress competition on Pattern Review a few years ago.

Then DH advised me we are off to the annual convention for his business and we have a fancy dress night (dress as someone famous) and the Gala dinner to attend.

I soon realized that when I printed off this pattern I hadn’t checked the print size box so the pattern wasn’t a true size 32 so I started with my TNT dress Simplicity 2648 and changed this pattern by:

  • Straightened the shoulders (the forward shoulder adjustment didn’t work with this style). 
  • Joined the back bodice and skirt together at the waist and made a full back piece on the fold. 
  • Took out a further .5cm (2/8″) sway back adjustment. 
  • Reduced the length of the back darts at the top by 2.5cm (1″).
  • Moved the zip to the left side seam. 
  • Took a .8cm (3/8″) gaposis tuck out of the back neck band.
  • Drafted an all-in-one facing for the neck line and armholes. 

This brown linen has been maturing in my stash since 2009 purchased from The Fabric Store and it is fully lined with Sun Silky.

For the back neck pieces I used Textureweft and fused it with two layers making sure that I had the grain lines going in opposite directions and I fused the top of the back point.

Construction

As I wanted a clean finish on the neckline and back sections I used the information in the Singer Sewing Book dated 1969.

The rest of the dress was was straightforward and of course the lining has a lace edge.

For the Gala dinner (they tend to be rather low key).

and for the Fancy Dress:

I have a number of garments planned but the next project is to work on the Jean-ius course with Kenneth King through Craftsy using a pair of Levis 550 that I love the fit of.

Lining a Skirt

dlogan asked a few posts ago how I lined my Vogue 7937 skirt, so here is the way I  was shown by Roberta Thompson (who wrote many articles for Australian Stitches) many years ago when she held sewing classes here in Sydney.

Fashion Fabric – Black wool
Lining – Charcoal Sun Silky

Cut out my fashion fabric.

Cut out the lining using exactly the same pattern pieces I used for the fashion fabric except I fold back the vent pieces as these are cut off when I do the lining hem.

The fashion fabric is sewn together as per the pattern excluding the waistband/facing. 
The lining is sewn together leaving the right hand side open for the zip, opposite to the fashion fabric zip opening (you will see why later). 

Now you have two skirts, one in your fashion fabric and one in lining. 

Pin the two skirts together at the waist, right sides together.

I then baste this seam together so nothing can move.

I am not a fan of facings on my skirts, so I use cotton twill tape* as my waistband/facing stabiliser. I don’t cut the twill tape to any length, I just have it on my lap and place it under the machine foot and start it off for the final waistband stitching.  Whilst sewing you pull the twill tape slightly so there is some tension on the tape sewing it along the 1.5cm/5.8″ seam line. This then helps the waist cup to my body.

Turn the lining to the inside of the skirt and I then stitch using my 1/4inch foot and 3.0 stitch length on my Janome MC 3500 on the right side of the skirt along the edge of the waistband.

As I am not level, I have the assistance from my darling husband to level the skirt and then I prepare the hems:

Fashion Fabric

  • Press the hem edge, making sure not to press a pin head. 
  • Open up the hem and trim the excess fabric so that I have a hem width of 3cm/1 1/8″.
  • I fuse a 4cm/1 1/2″ wide (1cm/3/8″ wider then the hem width) strip of Textureweft (pinked along the top edge**) along the hem fold line (I do not fuse the strip over any seam allowances) to give the hem some body and this gives you a great base for doing your Herringbone stitch for the hem.   
  • I also mitre the hem/vent corners on the fashion fabric.
Lining

For the skirt lining I cut this to be shorter than the fashion fabric by 2.5cm/1″ *** all the way around, disregarding the extra fabric at the vents.

Once I have shortened the skirt lining, I then work on the fabric around the vents.

  • From the corner of each vent I measure in 6cm/2.4″ and put a chalk mark.
  • Then using my French Ruler I draw a curve like this from the vent edge to the hem edge.
    • Cut away the excess lining fabric and this is how the inside of the skirt looks around the vents.

    • Finish off your lining hem as you wish.

      Here is the finished skirt!

      Centre back vent showing mitred corners and Hong Kong finishes

      * I pre-shrink the cotton twill tape.

      **I have a bag full of these strips already cut on hand.

      *** Another thing I like to do is to add lace to the lining hem.  So this doesn’t show I cut the lining to be shorter than the fashion fabric by the lace width + 2.5cm/1″ e.g. my lace for this skirt is 2cm/7/8″ so I cut my lining hem shorter by 4.5cm/1 7/8″. I do like having a little hidden secret that only gets to be seen if the wind decides to play with my skirt.

      How lucky am I !!

      Back at the beginning of May, Sandra from The Surley Seamstress had a Double Barrel Giveaway and I couldn’t believe my luck when I found out I had won the #2 Vintage for Grown Ups which arrived in the mail last week.

      The pack contained:
      • Burda magazine January 1975
      • Butterick dress pattern, undated size 12 bust 87cm
      • About 2 metres of retro print polyester satin

      The Burda magazine was printed in West Germany but has an English supplement so the pattern instructions are in English.  There is an interesting trench coat pattern as well as some interesting skirts and dresses.  The the retro print polyester satin is brown and lemon and it would be wonderful lining for my rain coat.

      Then Maria and I attended the Knitwit’s Seasonal Fabric Showing at Artarmon and the following fabrics found their way to my home last week,

      Left to right – Sandra Printed Knit, Waves texture knit in taupe, Adriana Printed Knit

      Now to figure out how I am going to be home when it is not raining so I can get all this pre-washed and ready to play with.

      Another Me Made month completed

      and I’m still enjoying them.

      This year there were an amazing 185 members signed up for Me Made May 2012 and a lot of them were new to the whole experience.

      I really enjoyed having Maria join the group this month, even though we are good buddies, we don’t see what each other wears during the working week, and she had some fantastic outfits to show.

      Maria and I organised to meet up with Janelle from Sew hopefull and Michele from My Own Inspiration at Pitt Trading during the month and introduce them to our favourite fabric shops.

      I did manage to be true to my pledge to “wear at least two me made pieces for the duration of May 2012” and the only times I felt I was cheating slightly was when I wore a dress and the 2nd item was Me-Made jewellery.

      Wrap-up

      •  I was surprised that I had enough Me-Made clothes in my wardrobe that some items didn’t even get a look in for the month.
      • One of the major holes I found was that I need cardigans for this time of year. My jackets are too warm at present and the two Simplicity 2603 cardigans got quite a work out.  I even succumbed to purchasing 2 cardigans. 
      • My SWAP garments helped fill out my wardrobe considerably and the only item from that group that didn’t get worn were the shorts, I can’t quite see me wearing them with tights. 

      You can all breathe a sigh of relief, no more Me-Made months are being officially organised this year, but next year will be interesting to see how up the ante for that one!

      Here’s how the month looked:

      Will be back soon, as I have some goodies to show you.